Here you can find the instruction on how to convert data from Paradox tables to Firebird database in Database Tour.
Note: This instruction can be also applied to exporting data to Interbase databases. The export interface is almost identical for Firebird and Interbase on the destination side.
Export Conditions
When converting Paradox data to Firebird, please consider the following:
- Paradox files can be opened either via ADO or BDE interface (if the BDE was installed on your computer).
- Firebird database can be opened either via ADO or FD interface.
- Make sure all involved database components (Database Tour software, Firebird client, Paradox ODBC driver etc) have the same architecture, i.e. either all are 32-bit or all are 64-bit. When using BDE to open Paradox files, all the task must be performed in Database Tour 32-bit.
Note: If your operating system is 64-bit, you can install both Database Tour 32-bit and Database Tour 64-bit and use them independently.
Configuring Paradox to Firebird Exporting
- Launch Database Tour.
- Register your source Paradox database. It must be a folder where the source Paradox (*.db) files are located.
- Register your target Firebird database. The recommended interface is FD, but other options are also available. If the target database does not exist yet, create a target Firebird file. Note: You can create and/or register the target database from the Export dialog during the exporting.
Export Steps
Exporting a Dataset
- Open the registered Paradox database.
- Choose a dataset to export. I.e. select a table in the table list or write and execute your database query.
- If you chose the table, switch to Data page.
- Click Export button
 in the toolbar above.
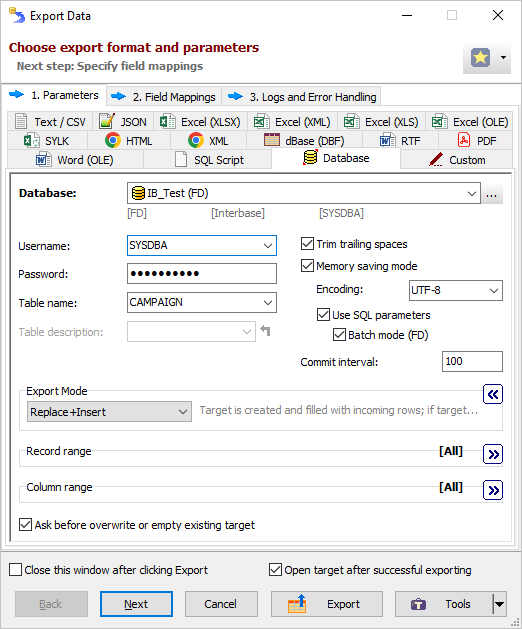
 - Switch to the Database tab. If this tab is not visible, click Favorite Export Formats button in the top-right corner of the window and make sure the Database item is selected.
- Select your registered Firebird database as the target database.
- Specify a target table. Turn on all Memory saving mode options. If source data and/or column names on any side may contain Unicode characters, make sure to choose the correct SQL stream Encoding, e.g. UTF-8. Choose the correct Export mode.

- Click Next. Check the source-to-target field mappings. Here, you can remove unnecessary mappings, add calculated fields, specify target column types (when exporting to a new table) etc.
- Click Export.
Exporting Multiple Datasets
- Open the registered Paradox database.
- You can export either selected tables or open datasets of any kind.
- Exporting selected tables
- Switch to the Tables tab to the left.
- Right-click the table list and choose Multiple Selection.
- Select tables to export.
- Click Export button or choose Tools | Export Data | Selected Tables... menu.
- Exporting open datasets (you can use SQL queries results or a mix of queries and tables)
- Open multiple SQL windows, type SQL queries there and execute them. Open needed tables too.
- Choose Tools | Export Data | Open Datasets... menu.
- Choose the datasets to export and click OK.
- Exporting selected tables
- Switch to the Database tab and select your registered Firebird database as the target database.
- Turn on Memory saving mode options. If source data and/or column names on any side may contain Unicode characters, make sure to choose the correct SQL stream encoding, e.g. UTF-8. Choose the correct Export mode. Leave the field for target table name blank.
- Click Next. Specify the source-to-target table mappings. Here, you can specify target table name for each source table and nested field mappings for every table pair.
- Click Export.
Resolving Export Performance Issues
In the case of the slow data exporting performance, there are some actions you can try:
- First of all, make sure the target database is connected via FD interface. Using FD on the target side lets you utilize batch SQL commands execution which can speed up the exporting process drastically.
- Try different combinations of Memory saving mode options and Commit interval setting. It is recommended to turn on the Memory saving mode, Use SQL parameters and Batch mode options and set the value of Commit interval from several hundreds to several thousands depending on you target server resources.
- Read recommendations for exporting large datasets and exporting average datasets.
Resolving Unicode Issues
If there are problems with exporting Unicode characters in text columns, check the following settings:
- If the stream Encoding option is available, make sure its value is UTF-8.
- In the Field Mappings section, make sure the character set for the corresponding target column(s) is UTF8. Please note that this setting will be applied for creating the target table (e.g. when using REPLACE+INSERT export mode). If the data are exported to existing table (e.g. in APPEND, UPDATE or APPEND+UPDATE export mode), make sure the existing destination column's character set is UTF8. If not, you can change the character set of the needed column in Database Tour by executing the following SQL command in the target database:
ALTER TABLE <table_name> ALTER COLUMN <column_name> TYPE <column_type> CHARACTER SET UTF8; - (Less importance) Check the default database character set (in connection properties); it is recommended to set it to UTF8.
Exporting Paradox to Firebird from Command Line
Here are some examples of exporting Paradox data to Firebird database using Database Tour command line. Each command line below can be easily transformed to an action file, which can be used instead of the command line. We recommend to use action files whenever possible because they are easier to maintain and are more comfortable to work with.
Note: The command line functionality is available in Database Tour Pro.
Exporting an Paradox Table to Existing Firebird Database
A command line to export a table from a Paradox file to existing Firebird database:
"C:\Program Files (x86)\Vitaliy Levchenko\Database Tour Pro 11\dbtour.exe" /export /ExportType=DATABASE /ExportMode=REPLACE+INSERT /IncludeMemo /MemorySaving /UseSQLParameters /UseBatchMode /Encoding=UTF-8 /SrcDBInterface=ADO /SrcDBKind=FILE /SrcDBDriver=Paradox /SrcDB=C:\MyDatabases /SrcTableName=salary /TrgDBInterface=FD /TrgDBKind=FILE /TrgDBDriver=Firebird /TrgCharset=UTF8 /TrgDB=C:\MyDatabases\employee.fdb /TrgTableName=SALARY
Notes
- You can export data to a new Firebird database, creating it on the fly. Just add /CreateTargetContainer switch to your command line. With this switch, Database Tour will create the target database, if it does not exist yet.
In the example above, field names and types in the target table will be the same (as far as possible) as in the source table due to invoking implicit field mappings. If you want to specify other structure for the target table, you should use explicit mappings and create a field mappings file, then add it to the command line:
/FieldMappingsFile=C:\MyDatabases\Export\SalaryFieldMappings.xml
You can create such a file in a few clicks from Export window when exporting one dataset.
Exporting in Silent Mode
Let's improve the above example by allowing it to run in silent mode, when no windows are shown. In this mode, it is recommended to add a log file to control the exporting process:
"C:\Program Files (x86)\Vitaliy Levchenko\Database Tour Pro 11\dbtour.exe" /silent /export /ExportType=DATABASE /ExportMode=REPLACE+INSERT /IncludeMemo /MemorySaving /UseSQLParameters /UseBatchMode /Encoding=UTF-8 /SrcDBInterface=ADO /SrcDBKind=FILE /SrcDBDriver=Paradox /SrcDB=C:\MyDatabases /SrcTableName=salary /TrgDBInterface=FD /TrgDBKind=FILE /TrgDBDriver=Firebird /TrgCharset=UTF8 /TrgDB=C:\MyDatabases\employee.fdb /TrgTableName=SALARY /LogFile=C:\MyDatabases\export.log
Exporting All Paradox Tables from a Folder
Exporting all Paradox files from a folder to existing Firebird database in silent mode:
"C:\Program Files (x86)\Vitaliy Levchenko\Database Tour Pro 11\dbtour.exe" /silent /export /ExportType=DATABASE /ExportMode=REPLACE+INSERT /IncludeMemo /MemorySaving /UseSQLParameters /UseBatchMode /Encoding=UTF-8 /SrcDBInterface=ADO /SrcDBKind=FILE /SrcDBDriver=Paradox /SrcDB=C:\MyDatabases /SrcTableName=* /TrgDBInterface=FD /TrgDBKind=FILE /TrgDBDriver=Firebird /TrgCharset=UTF8 /TrgDB=C:\MyDatabases\employee.fdb /TrgTableName=* /LogFile=C:\MyDatabases\export.log
Notes
In the example above, target table names and their column names will be the same (as far as possible) as in the source tables due to invoking implicit table mappings. If you want to override this behavior, you should use explicit mappings and create a table mappings file, then add it to the command line:
"/TableMappingsFile=C:\MyDatabases\Export\Paradox-To-Firebird-Table-Mappings.xml"
You can create such a file in a few clicks from Export window when exporting multiple tables.
Alternative Scenario Using Generated SQL Statements
If you for some reason could not export data directly from Paradox file to Firebird, Database Tour can export the Paradox data to a SQL script first, and then load data into Firebird database using Database Tour or any other SQL tool. You can export data to SQL script either by GUI or from the command line.
But please note, that when choosing exporting to SQL script, your export process will have two phases: first, exporting the data from the source database to SQL script; second, loading data from the script to your target database. So, this way can be less effective, especially for large datasets or when automating the data exporting.
Anyway, we recommend to try both scenarios and select the fastest and/or the most convenient one.
Reusing Export Configuration
Before closing the Export window, you might want to save your export configuration for future use.
Saving and Loading Field or Table Mappings
Sometimes, you need to reuse your changed field or table mappings, for example. For example, you overrode the default field mapping (i.e. deleted some fields, added calculated fields, changed the target field names etc), and want to save your work. You can save the field/table mappings to a file by clicking Save button (above the mapping grid). Next time, when exporting the same or similar table, you can load the mappings from that file by clicking Load button.
The created field mappings file or table mappings file can also be used in building your command line when automating the exporting process.
Saving and Loading Export Definitions
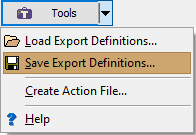
You can save all export definitions (including field/table mappings and other selected options) by choosing Tools | Save Export Definitions.... To load the definitions from file, choose Tools | Load Export Definitions.... Such a practice can save your time and guaranties that specified combination of options will be exactly reproduced.

See also


