


This topic describes how to export data from Microsoft SQL Server database to Oracle database in Database Tour.
Export Preparation
It is not mandatory but it is recommended to register both the source and the target databases before you start to configure your export process.
For speed reasons, it is recommended to use FD interface for both source and target databases.
Both databases must support the same architecture: 32-bit or 64-bit. I.e. one Database Tour instance must successfully open both databases.
Note: On our websites, you can find both versions of Database Tour: 32-bit and 64-bit. Please check which one you are downloading. If your operating system is 64-bit, you can install both Database Tour 32-bit and Database Tour 64-bit and use them independently. Please also note that one user license covers both 32-bit and 64-bit versions.
Export Steps
Exporting a Dataset
- Open the source SQL Server database.
- Choose a dataset to export. I.e. select a table in the table list or write and execute your SQL query.
- If you chose the table, switch to Data page.
- Click Export button.
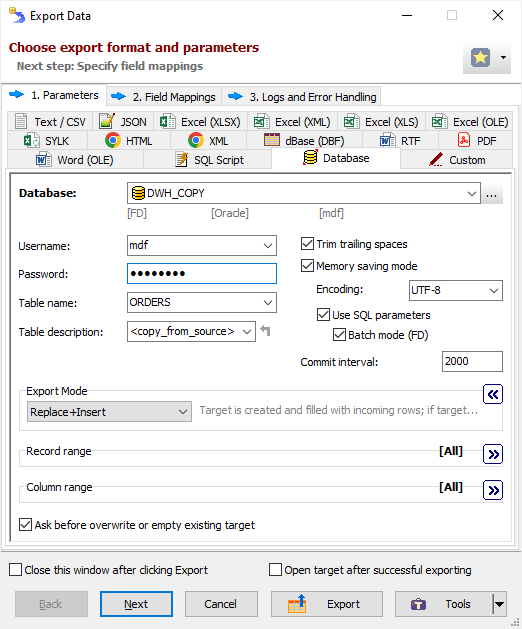
- Switch to the Database tab. If this tab is not visible, click Favorite Export Formats button in the top-right corner of the window and make sure the Database item is selected.
- Select your registered Oracle database as a target database.
- Specify a target table.
- Please carefully review the following export options, as they might affect the export speed significantly:
- It is recommended to choose Memory saving mode, Use SQL Parameters, Batch mode options. In case of exporting problems, if you suspect that they can be caused by these options, try different combinations of them. If source data and/or column names on any side may contain Unicode characters, make sure to choose the correct SQL stream Encoding, e.g. UTF-8.
- Commit interval. The bigger its value, the faster your exporting process. But too big value may cause memory and other issues. Therefore, try to play with it to find the optimal value before porting the solution to your production environment.
If your dataset is extra large, please consider our recommendations for exporting large datasets.
- Choose the needed Export mode and other options:
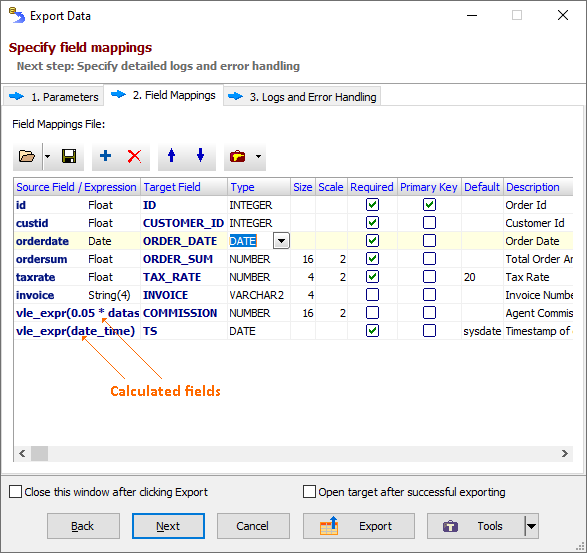
- Click Next. Check the source-to-target field mappings, i.e. the correspondence between source and target fields (columns).
It is possible to specify full column specifications and comments (descriptions) for target columns here. They will be applied when the the target table does not exist or needs recreating.
You can skip this step by clicking Export instead of Next; in this case the field mappings will be built implicitly according to column naming rules and available column types of the destination database.
- Click Export to begin the export procedure. You can interrupt the process by pressing ESC or by clicking Cancel in additional window which is shown during the exporting process.
Exporting Multiple Datasets (Tables and/or Query Results)
- Open the source SQL Server database.
- You can export either selected tables or opened datasets of any kind.
- Exporting selected tables
- Switch to the Tables tab to the left.
- Right-click the table list and choose Multiple Selection.
- Select tables to export.
- Click Export button or choose Tools | Export Data | Selected Tables... menu.
- Exporting open datasets (you can use SQL queries results or a mix of queries and tables)
- Open multiple SQL windows, type SQL queries there and execute them to open data. Open needed tables too and switch to Data page in each table window.
- Choose Tools | Export Data | Open Datasets... menu.
- Choose the datasets to export and click OK.
- Exporting selected tables
- Switch to the Database tab and select your registered Oracle database as a target database.
- Specify export parameters:
- Turn on the Memory saving mode option and its related options. In case of exporting problems, if you suspect that they can be caused by these options, try different combinations of them.
- Choose the Export mode to be applied to the most of the tables. You can override it for specific tables at the next step. For example, it can be Replace+Insert for the most of the target tables, Update for some of the tables, Append+Update for others etc.
- Leave the field for target table name empty. Fill it only if you need to export all source datasets to one target table.
- Click Next and specify the source-to-target table mappings, i.e. the correspondence between source datasets and target tables.
It is possible to specify full column specifications for target tables here, and override Export mode for each table (if you need different export modes for different tables).
SQL Server and Oracle support table and column comments (descriptions), and you can specify them here; use <copy_from_source> macro to force the application to copy the descriptions from the source tables (if any) to target tables. Note that descriptions are applied during the table creation only; they are ignored when the record mode is appending, updating, or deleting records in existing target table(s).
You can skip this step by clicking Export instead of Next; in this case the table mappings will be built implicitly according to naming rules of the destination database.
- Click Export.
Resolving Export Performance Issues
In the case of the slow performance, there are some actions you can try:
- First of all, make sure the target database is connected via FD interface. Using FD on the target side lets you utilize batch SQL commands execution which can speed up the exporting process drastically.
- Try different combinations of Memory saving mode options and Commit interval setting. It is recommended to turn on the Memory saving mode, Use SQL parameters and Batch mode options and set the value of Commit interval from several hundreds to several thousands depending on you target server resources.
- Read recommendations for exporting large datasets and exporting average datasets.
Migrating Data via Command Line
Notes
- This functionality is available in Database Tour Pro.
- A basic command line can be generated automatically by choosing Tools | Build Command Line | Export / Import Data... menu.
- The basic command line and example below can be improved by adding other command line switches and parameters according to the documentation.
SQL Server to Oracle Exporting from Command Line
The command line for exporting multiple tables from SQL Server to Oracle looks like this:
dbtour.exe /silent /export /ExportType=DATABASE /ExportMode=REPLACE+INSERT /CommitInterval=1000 /MemorySaving /UseSQLParameters /UseBatchMode /Encoding=UTF-8 /LogFile=C:\DWH\Export\Log\export.log /AppendLog /SrcDBInterface=FD /SrcDBKind=DSN "/SrcDBDriver=SQL SERVER" /SrcServer=localhost\SQLEXPRESS /SrcDB=master /SrcDBUserName=sa /SrcDBPassword=sa_password /TrgDBInterface=FD /TrgDBKind=DSN /TrgDBDriver=ORACLE /TrgOSAuthentication=Yes /TrgAuthenticationMode=Normal /TrgVendorHomepath=C:\app\John\product\12.1.0\client_1 /TrgDB=cloud_prod "/TableMappingsFile=c:\DWH\Export\SQL-Server-To-Oracle-Table-Mappings.xml"
SQL Server to Oracle Exporting by Action File
The command line above can be transformed to an action file, which is much more comfortable to work with. The action file contains all the command line parameters (except /silent switch), one parameter per line, and allows comments:
/export
/ExportType=DATABASE
/ExportMode=REPLACE+INSERT ;Target tables recreated when exist
;/ExportMode=APPEND ;Incoming records are appended to target tables
/CommitInterval=1000 ;COMMIT after exporting every 1000 records
/MemorySaving
/UseSQLParameters
/UseBatchMode
/Encoding=UTF-8
/LogFile=C:\DWH\Export\Log\export.log
/AppendLog
/SrcDBInterface=FD
/SrcDBKind=DSN
/SrcDBDriver=SQL SERVER
/SrcServer=localhost\SQLEXPRESS
/SrcDB=master
/SrcDBUserName=sa
/SrcDBPassword=sa_password
/TrgDBInterface=FD
/TrgDBKind=DSN
/TrgDBDriver=ORACLE
/TrgOSAuthentication=Yes
/TrgAuthenticationMode=Normal
/TrgVendorHomepath=C:\app\John\product\12.1.0\client_1
/TrgDB=cloud_prod
/TableMappingsFile=c:\DWH\Export\SQL-Server-To-Oracle-Table-Mappings.xml
The action file can be executed either from Database Tour GUI, in Open Data Source dialog, or from the command line like this:
dbtour.exe /silent /ActionFile=c:\DWH\Export\ExportActionMsSqlOra.txt
Example of SQL Server to Oracle Table Mappings File
The table mappings file contains the correspondence between source and target table names. Optionally, each table pair can include nested field mappings, i.e. the correspondence between source and target columns. The following example contains the table mappings for three tables. One of them contains nested field mappings; for others tables, the field mappings will be built automatically. It is recommended that you specify table and field mappings explicitly.
You can create such files either in the Export dialog on the Table Mappings step or manually using a text editor.
<?xml version="1.0" encoding="UTF-8"?>
<!-- Source-to-Target table mappings for master database -->
<TableMappings>
  <Items>
    <TableMapping>
      <Source>
        <TableName>dbo.customer</TableName>
      </Source>
      <Target>
        <TableName>DWH.CUSTOMER</TableName>
        <TableDescription>Customers</TableDescription>
      </Target>
      <FieldMappings>
        <Items>
          <FieldMapping>
            <Source>
              <FieldName>cust_it</FieldName>
            </Source>
            <Target>
              <FieldName>CUSTOMER_ID</FieldName>
              <FieldType>INTEGER</FieldType>
              <FieldNotNull>1</FieldNotNull>
              <FieldDefaultValue></FieldDefaultValue>
              <FieldSQLSpecification>INTEGER</FieldSQLSpecification>
              <FieldDescription>Internal customer identifier</FieldDescription>
            </Target>
          </FieldMapping>
          <FieldMapping>
            <Source>
              <FieldName>cust_name</FieldName>
            </Source>
            <Target>
              <FieldName>CUSTOMER_NAME</FieldName>
              <FieldType>VARCHAR2</FieldType>
              <FieldSize>60</FieldSize>
              <FieldNotNull>1</FieldNotNull>
              <FieldDefaultValue></FieldDefaultValue>
              <FieldSQLSpecification>VARCHAR2(60)</FieldSQLSpecification>
              <FieldDescription>Full customer name</FieldDescription>
            </Target>
          </FieldMapping>
        </Items>
      </FieldMappings>
    </TableMapping>
    <TableMapping>
      <Source>
        <TableName>dbo.order</TableName>
      </Source>
      <Target>
        <TableName>DWH.ORDER</TableName>
        <TableDescription>Orders</TableDescription>
      </Target>
    </TableMapping>
    <TableMapping>
      <Source>
        <TableName>dbo.payment</TableName>
      </Source>
      <Target>
        <FileName>DWH.PAYMENT</TableName>
        <TableDescription>Payments</TableDescription>
      </Target>
    </TableMapping>
  </Items>
</TableMappings>
See also