


How the Database Query Tool Works
Running Scripts with Multiple SQL Statements
Asynchronous SQL Query Execution
Queries with Parameters and Macros
Querying Several Databases at Once
How the Database Query Tool Works
Like most of SQL query tools, the Database Tour does not execute your database queries directly. It makes some checks and then passes the queries for execution to the core application intended for doing this: your database server or database engine (FD, ADO etc.). Therefore, SQL queries should be written using rules defined for currently opened database: for example, if you open Oracle database, write your query following Oracle database rules etc.
This topic describes the common technique and Database Tour specific capabilities which helps you to build your queries and get their results. You will not find SQL tutorial here (at least because it is impossible to know all details of SQL for all existing types of databases). For more details about writing the SQL queries, please read your database documentation.
SQL Query Windows
To create a new SQL window in active database, click New SQL Window button ![]() , or choose Query | New... menu, or press Ctrl+Q. You can create any number of SQL windows for each database (you are limited only by operating memory and the screen size).
, or choose Query | New... menu, or press Ctrl+Q. You can create any number of SQL windows for each database (you are limited only by operating memory and the screen size).
In the SQL window, there are several pages:
- Edit. The place where you type your database query text.
- Result. Here, the result of the SELECT query is shown. This page is shown only if the corresponding option of SQL Editor is on; when the option is off (default), the query result is shown at the bottom of the Edit page.
- Output. This page shows server output for Oracle and PostgreSQL databases. See more below.
- History. This page contains SQL execution history for this SQL window.
SQL Editor
SQL statement can be entered manually or loaded from a file (including loading from command line) on Edit page. There are several templates of the most often used SQL expressions, which are available by clicking Templates button; select a template and then just edit its SQL text to produce needed SQL expression.
A toolbar above the editor and the context menu of the editor contain a lot of functions, which facilitate editing and formatting the SQL text.
The status bar below shows the caret position (line and column) and selection size (if any).
SQL syntax highlighting
The SQL editor supports SQL syntax highlighting. Use Options | Environment | SQL editor | Font and Color to change the parameters of the syntax highlighting.
In addition, there is an ability to specify the SQL dialect for the syntax highlighting. Different SQL dialects are usually applied to different database types and have different sets of key words and some other options, which can change the highlighting of some elements in your SQL code. In most cases the SQL dialect is set automatically depending on the type of the current database (e.g. dBase, Oracle, SQL Server). But in some cases you may want to change it to more suitable (for example, change SQL dialect for your SQL Server database from MS SQL 7 to MS SQL 2K and vice versa); you can do this under Query menu. Please note that SQL dialect, as the syntax highlighting itself, does not have any influence on query executing, and is used only for convenient showing the SQL code.

It is possible to save an SQL text to a file or print it. When printing SQL text or saving it to RTF or HTML documents, the syntax highlighting and colors are kept.
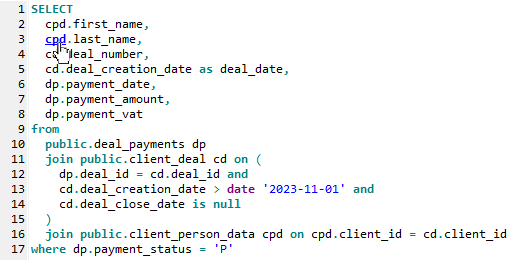
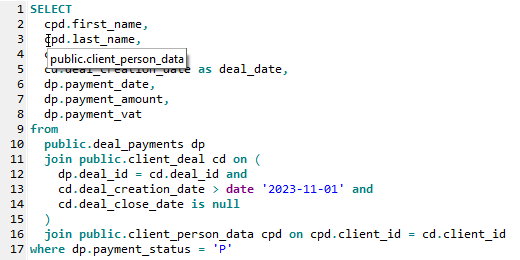
Clickable objects
If you press and hold Ctrl and move the mouse over the SQL text at the same time, the Database Tour tries to analyze the words under the mouse. If a word under the mouse is recognized as a special object which can be processed by the application in the current context, it becomes a hyperlink. If you click the link, a certain action is done to the object depending on its type:
- if the word is a a name of a database object (table, view, stored procedure and several others), the Database Tour opens it in a separate window;
- if you are editing a stored procedure or anonymous block, and the clicked word is a name of a parameter or variable, you will be moved to the parameter/variable definition, which is especially convenient when viewing or editing large code;
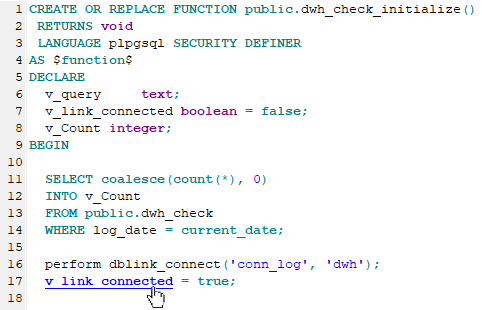
- if the word is a SQL alias of a database table, you will be moved to the place, where the table is specified in the code; it is useful when your SQL command is large or complicated.
You can customize the usage of SQL hyperlinks by the corresponding options of SQL Editor.
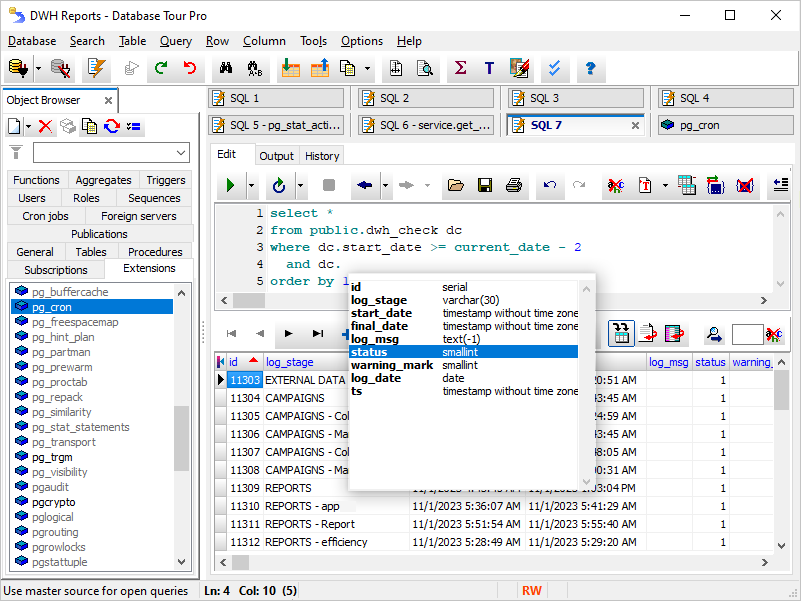
SQL token hints
If you slightly move the mouse over the SQL text, the Database Tour can show you some info about the token under the mouse, for example, when the token is a table alias or stored procedure variable.
Stored procedure variable hint shows the type and default value of the variable:
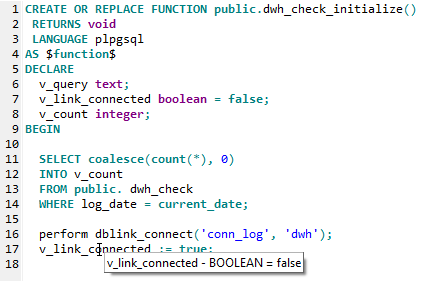
Table alias hint shows the full name of the used database table:
You can customize the usage of SQL token hints by the corresponding options of SQL Editor.
Query Execution
To execute SQL statement(s), shown in SQL editor, click Execute Query button ![]() . Note: if there is selected text in SQL editor, then only selected statement(s) will be processed.
. Note: if there is selected text in SQL editor, then only selected statement(s) will be processed.
In the drop-down list of the Execute Query button, you can choose some additional actions:
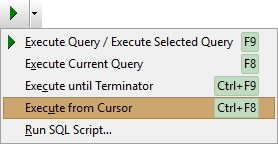
- Execute Query / Execute Selected Query - Behaves as clicking Execute Query button.
- Execute Current Query - Executes current SQL statement (i.e. the statement where the cursor is located).
- Execute until Terminator - Actual for Oracle and SQL Server databases. Executes SQL statements until SQL terminator is found; for Oracle, the terminator is a slash at the beginning of the line, and for SQL Server, it is a GO word. For other databases, the semicolon is usually used as a terminator, so execution will stop on the first semicolon.
- Execute from Cursor - Executes all SQL statements from the current cursor position to the end of file.
- Execute SQL Script... - Behaves as clicking Execute Query button, but before the execution, it asks for the file to write the execution log.
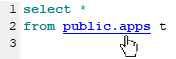
If the SELECT query was successfully executed, the result data will be shown on the Result page (or below the query text depending on the corresponding option). To work with these data, you can use some items from the Tools menu or the corresponding buttons from the main toolbar (when you on the page showing the result set). For example, you can export or print the query data etc.
To quickly build a query for selecting data from a table, you can just choose Generate SQL | Query Data... item from context menu of the needed table in the table list.
Editing SELECT query results
Some databases allow to edit the result of SELECT query, if it comply certain criteria (e.g. using only one physical table, not using aggregate functions in the SQL command etc). Additionally, you have to turn on the Use editable queries, if possible option before opening the query. After SELECT query execution, active editing buttons (Delete, Edit etc.) confirm the query was opened in edit mode.
History of executed queries and navigation between them
The application saves the SQL texts of the executed queries (their quantity specified by the corresponding option) and some statistical information about them for each SQL window of each database. This information is available on History page of the corresponding SQL window. It can be copied to clipboard, which allows to automatically create the script with all queries from the history. To exchange SQL texts between different databases, use Export SQL History and Load SQL History buttons. To quickly copy SQL texts from one database to another, open the first database, then go to History page and open the second database holding SHIFT down. To navigate between SQL texts, use the Previous SQL, Next SQL buttons on Edit page, corresponding items from the Query menu or double-click needed row on History page.
History of all SQL windows of all registered databases are saved to a workspace file (full path of the file can be seen from Database | Registered Databases... menu). This saving is done in the following cases: before executing a query, before database closing, and before the application's closing. Please consider this information when working with multiple instances of the application. When the application is restarting, all history of all SQL windows of all databases are loaded from the workspace file into operating memory; then, when certain database is opening, all its SQL windows and their history are restored.
Execution by timer
There is a possibility to execute the query by a timer. Use Execute by timer button ![]() for that. When you click this button, the Database Tour is repeating the query execution by timer. This can be useful, for example, when you monitor the often-changed data or logs, or for testing purposes. In the drop-down list of the button, you can change the corresponding options like timer interval etc. To stop the execution cycle, just click the button again to restore its unpressed state.
for that. When you click this button, the Database Tour is repeating the query execution by timer. This can be useful, for example, when you monitor the often-changed data or logs, or for testing purposes. In the drop-down list of the button, you can change the corresponding options like timer interval etc. To stop the execution cycle, just click the button again to restore its unpressed state.
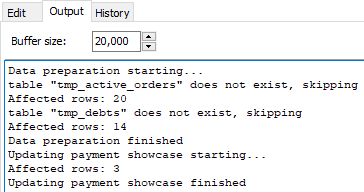
Server Output
On the Output page, it is possible to see the server output generated during the query execution (for Oracle and PostgreSQL databases, opened by FD interface). You can use the server output to debug your stored procedures or to control their execution.
In Oracle databases, it is a feedback sent using DBMS_OUTPUT package.
In PostgreSQL databases, it can be PostgreSQL errors, warnings, hints, or a feedback produced, for example, by RAISE NOTICE commands.
Example of the server output in PostgreSQL database:
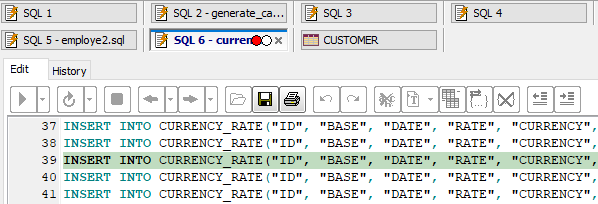
Running Scripts with Multiple SQL Statements
There is an ability to run multi-statement SQL scripts (scenarios). Each statement in the script must be separated with a statement separator (sometimes called terminator): a certain character or set of characters (without spaces), which is specified on the database connection level.
| Database type | Default SQL statement separator |
|---|---|
| Interbase | Caret sign (^) |
| Firebird | Caret sign (^) |
| Oracle | Combination of the semicolon (;) and SQL Plus style separator (a slash (/) at the beginning of the new line after the statement; to specify it in the database settings, use a <sqlplus> macro). If you rely on defaults, it is recommended to use a SQL Plus style separator to separate PL/SQL blocks (where the semicolon is a part of the language) and a semicolon in plain SQL. |
| SQL Server | A GO word at the beginning of the new line after the statement; to specify it in the database settings, use a <mssqlgo> macro. |
| Other | Semicolon (;) |
Executing multi-command SQL script:
To change the SQL statement separator for a certain database, make sure the database is closed, then choose Database | Registered Databases... menu, select the needed database, click Edit button, find the SQL statement separator property, change its value to whatever you need, and click Apply Changes.
There is also an advanced way to execute multi-statement SQL scripts using a drop-down menu near Execute button, where you can also specify a log (result) file to save the information about each statement processing result. Attention! In this mode, when error is occurred during the statement execution, the current statement is skipped and the process continues with the next statement.
After the script execution ends, you can switch to the History page and see detailed statistics for every executed command in the pane below. If you double-click the line number of the command here (left-most column), you will be quickly moved to that line in the SQL editor.
Asynchronous SQL Query Execution
Asynchronous execution means running more than one query at the same time (from different SQL windows) or working with the application interface while the query (queries) still executing. To enable asynchronous execution, turn the corresponding option from Database section on.
Please note that not all databases allow to run database queries in parallel. If your database does not support that, you still will be able to run multiple SQL queries at the same time and work with Database Tour interface, but the database will process your queries successively.
Asynchronous query execution in PostgreSQL database:
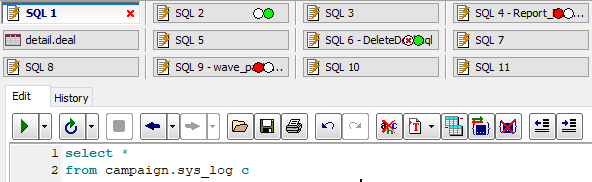
Here, we are working with SQL text in SQL 1 window, while four other windows execute their queries.
One of them already finished successfully, another one finished with error, and two others are still in progress.
Queries with Parameters and Macros
Parameters and macros are substitution variables in queries. They improve flexibility of query execution by allowing dynamically change the query (without changing of SQL text) in runtime before the execution. These variables get their values directly before query execution either by user input, command line parameters, report (when the query is executed as part of report), or they can be calculated automatically if they are predefined macros or parameters (see below). Macros are always text variables; their values just replaces macros text in the SQL text before query execution. Unlike macros, parameters have type; their values and types are passed to server and not inserted in SQL text. Macros and parameters inside comments or string literals are ignored by the application SQL engine, but is not recommended to use parameters inside comments, especially in ADO connections. Although macros are often more convenient to use, using parameters are preferable as they help in performance optimization and against SQL injection.
If parameter or macro is not predefined one and its value was not defined in command line or report (Database Tour Pro only), the user will be prompted to enter it in a separate window.
Macros begin with << and end with >>. Macros are defined mainly for substitution when executing queries via command line. In the following SQL example, there is a macro CUST_TYPE_LIST:
SELECT *
FROM payments
WHERE customertype in (<<CUST_TYPE_LIST>>)
The value for this macro can be, for example, the following string:
3, 8, 12, 5
Note that such thing cannot be produced using parameters.
Parameters begin with colon. Parameters, which contain spaces, must be enclosed in single quotes. Parameterized queries are convenient for using the same SQL statement for many data values. In the following SQL example, there is a parameter DATE:
SELECT *
FROM payments
WHERE paydate = :DATE
When the application executes such a query, it suggests user to enter parameter value and data type, and then continues execution. To select parameter data type automatically by the application, you may specify this data type directly in SQL statement in the separate comments right after parameter, as shown in the following example:
SELECT *
FROM orders
WHERE orderno < :ORDERNO /* ParamType=Integer */
There are several predefined parameters, which are calculated automatically by the application and does not require user or command line input:
| <<SYSTEM_DATE>> | Replaced by current date (with Date type) |
| <<SYSTEM_DATETIME>> | Replaced by current date and time (with DateTime type) |
| <<SYSTEM_TIME>> | Replaced by current time (with DateTime type) |
| <<SYSTEM_YEAR>> | Replaced by current year (with Integer type) |
| <<SYSTEM_MONTH>> | Replaced by current month (with Integer type) |
| <<SYSTEM_DAY>> | Replaced by current day (with Integer Type) |
If the predefined parameters begin not with colon, they are interpreted as predefined macros. In case of integer data, the result will be the same, but in case of their data types there may be problems, therefore please don't confuse parameters and macros.
Using Master Source
You can use a master source for query. Master source is the table, opened in the separate window. If SQL text contains a column name of the master table followed by the colon, then this will be interpreted as parameter. Value of this parameter is taken from corresponding field of the master source (such field must exist in the source).
Example (table 1 is used to select data from, table 2 as master source, and column 1 is a column from table 1):
SELECT *
FROM <table 1>
WHERE <column 1> = :CUSTOMER
Select master source (table 2) from the table list and right-click it. Choose Open in the Separate Window from the context menu. The table must contain CUSTOMER field. Click the Use Master Source button (on Result page) and execute the query. You will see the record set from the table 1, in which value of column 1 equal to value of the CUSTOMER field from the master source (table 2). When you moved cursor of the table 2 to another record, then the query will automatically reopened to match value of column 1 to the new value of the CUSTOMER field.
Querying Several Databases at Once
There is an ability to build SELECT queries, which refer another database from open local database (only BDE connections). Moreover, you can join tables from several different databases (so called heterogeneous joins). Local database is any database with Paradox, dBase, or FoxPro tables, connected via BDE alias or folder name. The external database may be folder reference (for local tables), ODBC DSN or a BDE alias. To refer a table from external database, prefix the table name with colon, external database name, and another colon, and enclose this construction in quotation marks, for example:
SELECT c.custno, o.orderdate
FROM ":CustDSN:customer" c, ":OrderAlias:order" o
WHERE ...
See also