Export Conditions
When exporting data from dBase to Paradox and vice versa, please consider the following:
- You can work with dBase and Paradox data via ADO or BDE interface (if the BDE was installed on your computer). For example, you can open the source table by ADO, and the target table by BDE, or vice versa; or you can use the same interface on both sides of the export process. But please also read the important notes below.
- When using ADO and ODBC, the Database Tour architecture class (i.e. 32-bit or 64-bit) must match the architecture class of the corresponding ODBC driver.
- When using ADO and Microsoft ACE, the Database Tour architecture class must match the architecture class of the installed Microsoft Office.
- When using ADO and Microsoft Jet, Database Tour 32-bit must be used.
- When using BDE, Database Tour 32-bit must be used.
Note: If your operating system is 64-bit, you can install both Database Tour 32-bit and Database Tour 64-bit and use them independently.
Export a Dataset
- Launch Database Tour.
- Register your source dBase database. It must be a folder where the source .dbf files are located.
- Choose a dataset to export. I.e. select a table in the table list or write and execute your database query.
- If you chose the table, switch to Data page.
- Click Select a Database button and select destination folder for the new Paradox table; from the driver list, select Paradox (for ADO) or STANDARD (for BDE); click OK.
- Specify table name for the new table and other desired export options; for export mode, choose Replace+Insert. Click Next.
- Specify field mappings between the source and target fields. Here, you can choose which fields to export and specify names for target fields. You can also add calculated fields if necessary. Click Export.
Export Multiple Tables
- Open your source dBase database.
- Right-click the table list and choose Multiple Selection menu item, then select the tables to export.
- Click Export Data button.
- Switch to the Database tab.
- Click Select a Database button and select destination folder for the new Paradox table; from the driver list, select Paradox (for ADO) or STANDARD (for BDE); click OK.
- Specify desired export options; for export mode, choose Replace+Insert. Leave Table Name field blank. Click Next.
- Specify table mappings between the source and target tables. Here, you can specify names for target tables. Click Export.
Export Data via Command Line
Notes
- This functionality is available in Database Tour Pro.
- The examples below can be transformed to action files, which are much more comfortable to use.
Converting one DBF table to Paradox
dbtour.exe /export /ExportType=DATABASE /ExportMode=REPLACE+INSERT /SrcDBInterface=ado /SrcDBDriver=dBase "/SrcDB=c:\my db\types.dbf" /TrgDBInterface=bde /TrgDBDriver=Paradox "/TrgDB=c:\my db\types.db"
Optionally, you can add other command line parameters according to the documentation. For example, consider adding /FieldMappingsFile option to load your customized field mappings and override the default field mappings between the source and target fields.
Converting all DBF tables in a Folder to Paradox
dbtour.exe /export /ExportType=DATABASE /ExportMode=REPLACE+INSERT /SrcDBInterface=ado /SrcDBDriver=dBase "/SrcDB=c:\my db\*.dbf" /TrgDBInterface=bde /TrgDBDriver=Paradox "/TrgDB=c:\my db\*.db"
Optionally, you can add other command line parameters according to the documentation. For example, consider adding /TableMappingsFile option to load your customized table mappings and override the default table mappings between the source and target tables; without explicitly specified table mappings, target tables/files will have the same names as the source tables.
Exporting from Paradox to dBase
Exporting data in the opposite direction works similarly because the Database Tour provides universal export interface for different database types. You just need to swap the source and target databases.
Reusing Export Configuration
Before closing the Export window, you might want to save your export configuration for future use.
Saving and Loading Field or Table Mappings
Sometimes, you need to reuse your changed field or table mappings. For example, you overrode the default field mapping (i.e. deleted some fields, added calculated fields, changed the target field names etc), and want to save your work. You can save the field/table mappings to a file by clicking Save button (above the mapping grid). Next time, when exporting the same or similar table or tables, you can load the mappings from that file by clicking Load button.
The created field mappings file or table mappings file can also be used in building your command line when automating the exporting process.
Saving and Loading Export Definitions
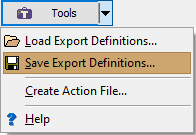
You can save all export definitions (including field/table mappings and other selected options) by choosing Tools | Save Export Definitions.... To load the definitions from file, choose Tools | Load Export Definitions.... Such a practice can save your time and guaranties that specified combination of options will be exactly reproduced.

See also


