


In Database Tour software, there are several ways of creating a table in the database:
- Making a copy of existing table
- Exporting existing table to the current or another database
- Using the table creating interface
Here, the last way is described.
So, open the needed database, then choose Table | New... menu. There will be three options available:
Create a Table Using GUI
Creating the table in a step-by-step mode.
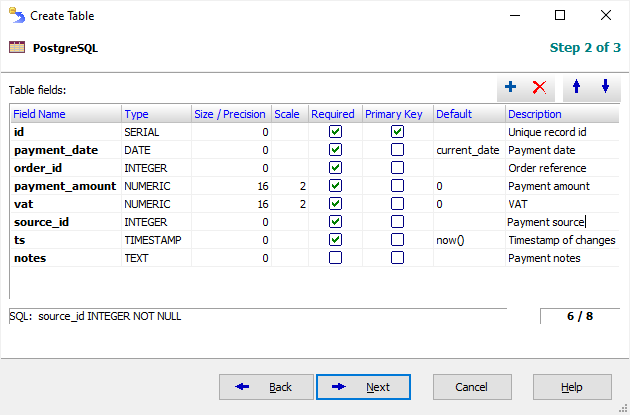
First, create an array of table fields/columns: names, types, sizes, auto-increment attributes, default values, primary key flags etc. You can do this from scratch or import the column structure from any existing table from the same database (template table) and then edit the structure accordingly.
Note that different types of databases can have different set of the table field types and attributes. For example, this is how it looks for PostgreSQL database:
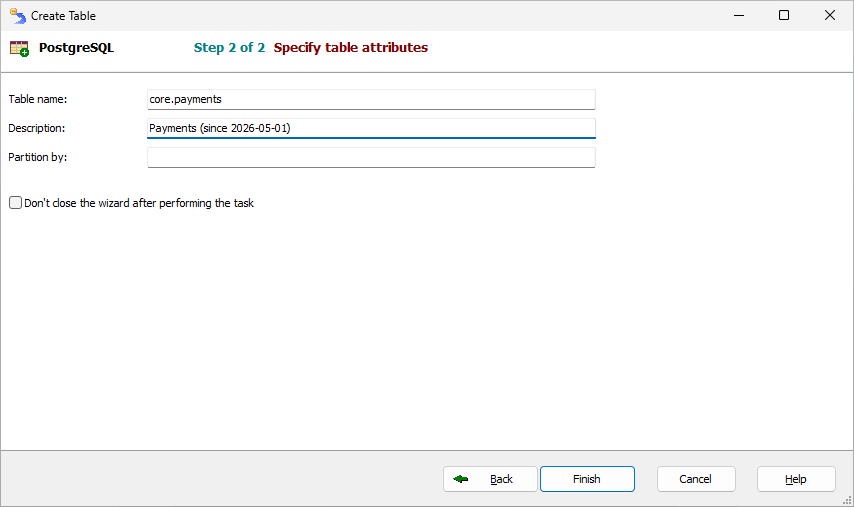
Then, specify the table name and some other table attributes (for example, table comment, if it is supported by the current database). After you finished, click Finish.
If no errors are found, then the specified table will be created and you will see it in the table list to the left of main window. In the case of error, you can click Back button, correct erroneous field entries and try again. In the case of continuous error messages, you can return to the first step, select the third way of creating the table (see below), and generate SQL text, correct it manually to avoid the error(s), and create the table by executing the SQL query.
Working with Fields table is very similar to working with database tables in Database Tour. Here are described the hot keys for several most important actions:
| Add new entry above current row | CTRL + Insert |
| Add new entry in the end of table | Move to the last row and press Down Arrow or TAB (if you are in the last column) |
| Cancel adding new entry | Esc |
| Delete entry | CTRL + Delete |
Create a Table Using SQL
Creating the table by SQL query.
After selecting this option and clicking Next/Finish button, you will be moved to SQL Editor, in which CREATE TABLE template will be shown.
Another way of getting the same result is to create a new SQL window, click Templates button right above the SQL editor, and select CREATE TABLE template from the drop-down list of SQL templates.
After that, just correct the table and field names in this SQL text and click Execute button. If no errors are found, then the specified table will be created and you will see it in the table list to the left of main window.
Combining GUI and SQL
Creating the table by GUI to produce a CREATE TABLE SQL command.
Here, you have an opportunity to build the field array and table attributes like you do in the first way (see above). But after clicking the Finish button, instead of creating the table immediately, a new SQL Editor window will be created and filled with the SQL text generated according to the specified parameters. You can modify the query if you need and then execute it to create the table.
Notes
- In some databases (for example, folder based databases, opened by BDE), at the second step you will need also to select a type of table to be created (e.g. dBase, Paradox, ASCII).
- For folder based databases, specify table name without full file path. In some cases (for example, for text databases), you need to add a file extension (.txt, .csv etc.).
- Each database type has its own rules for naming fields and tables, their own field types etc. Some of them are constantly changing. To learn these rules, please read the documentation for your database. Here are some basic information and common recommendations:
- Maximum size of field names in dBase is 10.
- Maximum size of field names in Paradox is 25.
- Maximum size of field names in Oracle is 128 for version 12.2 and above, and 30 for versions 12.1 and below.
- Maximum size of field names in SQL Server is 128.
- Maximum size of field names in DB2 is 128.
- Maximum size of field names in PostgreSQL is 63.
- Maximum size of field names in MySQL is 64.
- For most database types, try to avoid spaces, special characters like ^, *, ! etc. in the field and table names.
- For most database types, try to avoid non-English characters in field and table names.
- For some database types, you should specify non-zero field size for all field types; but in some database types, you should specify field sizes only for some field types like String, Memo, Bytes etc., and should leave field size as 0 for other field types like Integer, Float, SmallInt etc.
See also