In Database Tour software, you have a lot of possibilities for copying data from databases to clipboard. The basic documentation can be found using the links at the bottom of this topic. Here, let's concentrate on practical examples with detailed descriptions of options.
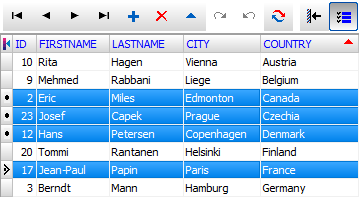
After you opened a source database, let's open a dataset to copy data from.

Sometimes, we want to copy specific rows only. To select rows, click Select Records button, then select needed rows using Shift+Up, Shift+Down combinations (for continuous range of rows) or Ctrl+Mouse (to select individual rows).

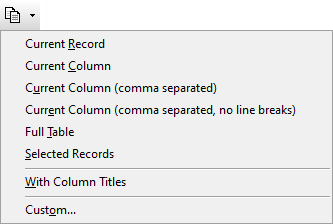
Then choose the Tools | Copy menu or simply click Copy Data to Clipboard button in the upper tool bar.

Quick Data Copying
All menu items above, except Custom... menu, are intended for quick data copying, i.e. copying without any customization, using TAB as a column separator and CR+LF as a row separator by default. Let's review them:
- With Column Titles If this menu item checked, quick data copying is done including column titles.
- Current Record Copy current record/row in the dataset. For the dataset above, we get:
17 Jean-Paul Papin Paris France
- Current Column Copy current column in the dataset. For the dataset above, we get:
10
9
2
23
...
- Current Column (comma separated) Copy current column in the dataset, using a comma as additional separator, which is convenient when using the result when writing SQL code, for example. For the dataset above, we get:
10,
9,
2,
23,
...,
- Current Column (comma separated, no line breaks) Copy current column in the dataset, using a comma as a column separator and omitting a row separator, which is convenient when writing SQL code, for example. For the dataset above, we get:
10,9,2,23,...,
- Full Table Copy full dataset. For the dataset above, we get:
10 Rita Hagen Vienna Austria
9 Mehmed Rabbani Liege Belgium
2 Eric Miles Edmonton Canada
23 Josef Capek Prague Czechia
12 Hans Petersen Copenhagen Denmark
20 Tommi Rantanen Helsinki Finland
17 Jean-Paul Papin Paris France
... ... ... ... ...
- Selected Rows Copy selected records/rows only. For the dataset above, we get:
2 Eric Miles Edmonton Canada
23 Josef Capek Prague Czechia
12 Hans Petersen Copenhagen Denmark
17 Jean-Paul Papin Paris France
If there are no selected records in the dataset, a current row will be copied.
Copying Data to Specific Target Format
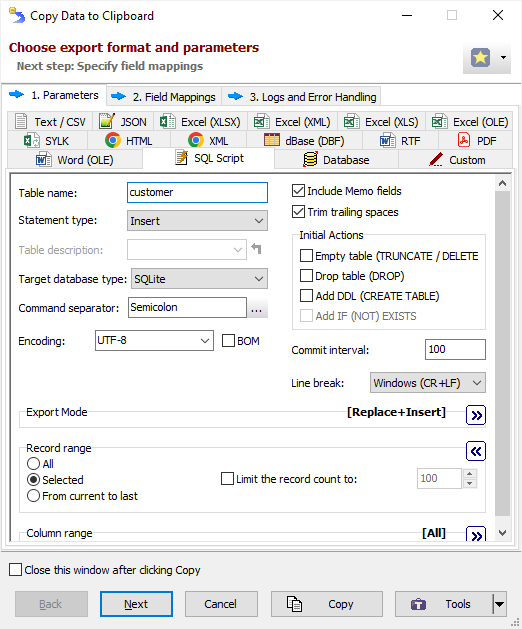
If copying data using default format is not what you want, choose Custom... item from the menu above. This will invoke standard Export dialog, where it is possible to choose the target format and its specific options.
Only text compatible formats are suitable for copying. Let's copy data to SQL script:

When only selected rows must be copied, choose Selected in the Record range section.
For the dataset above, we get:
INSERT INTO customer (ID, FIRSTNAME, LASTNAME, CITY, COUNTRY) VALUES (2, 'Eric', 'Miles', 'Edmonton', 'Canada');
INSERT INTO customer (ID, FIRSTNAME, LASTNAME, CITY, COUNTRY) VALUES (23, 'Josef', 'Capek', 'Prague', 'Czechia');
INSERT INTO customer (ID, FIRSTNAME, LASTNAME, CITY, COUNTRY) VALUES (12, 'Hans', 'Petersen', 'Copenhagen', 'Denmark');
INSERT INTO customer (ID, FIRSTNAME, LASTNAME, CITY, COUNTRY) VALUES (17, 'Jean-Paul', 'Papin', 'Paris', 'France');
COMMIT;


